Showing posts with label Apache. Show all posts

Friday, August 17, 2012

Installing Tomcat 7 on Ubuntu 12.04

This post is about installing Apache Tomcat7 on Ubuntu 12.04. Before this installation make sure java is installed in your machine. You can refer this post if you haven't done that already.
  1. Download Tomcat 7 tar.gz binary distribution from here.
  2. Unpack it using following command.
    tar xvzf apache-tomcat-7.0.29.tar.gz 
    
  3. Move it to a more appropriate location using following command.
    sudo mv apache-tomcat-7.0.29/ /usr/share/tomcat7
    
  4. Open up /usr/share/tomcat7/bin/catalina.sh file using following command
    gedit /usr/share/tomcat7/bin/catalina.sh 
    
  5. Add following two lines in there after the first line.
    JAVA_HOME="/usr/lib/jvm/jdk-6u32"
    JRE_HOME="/usr/lib/jvm/jdk-6u32/jre"
    
  6. Open up /usr/share/tomcat7/conf/tomcat-users.xml and uncomment user and role entries there. Then add a manager-gui role and a user by adding following lines there.
    <role rolename="manager-gui"/>
    <user username="pavithra" password="tomcat" roles="manager-gui"/>
    
  7. Start the Tomcat server using following command.
    sudo /usr/share/tomcat7/bin/catalina.sh run
    
  8. Verify Tomcat installation using the following URL.
    http://127.0.0.1:8080/
    
  9. To login as the manager, use the following URL, provide the relevant username and password.
    http://127.0.0.1:8080/manager/html
    

Friday, August 10, 2012

Installing Maven 3.0.4 on Ubuntu 12.04

To install Apache Maven 3.0.4 on Ubuntu 12.04 use following steps
  1. Get Maven 3.0.4 binary distribution using following command
    wget http://www.gtlib.gatech.edu/pub/apache/maven/binaries/apache-maven-3.0.4-bin.tar.gz
    
  2. Unpack the binary distribution using following command
    tar -zxf apache-maven-3.0.4-bin.tar.gz
    
  3. Move uncompressed "apache-maven-3.0.4" directory to the /usr/local directory using this command
    sudo cp -R apache-maven-3.0.4 /usr/local
    
  4. Create a symbolic link to /usr/bin using following command
    sudo ln -s /usr/local/apache-maven-3.0.4/bin/mvn /usr/bin/mvn
    
  5. Verify for correct installation using following command
    mvn –version
    
    It should print following
    Apache Maven 3.0.4 (r1232337; 2012-01-17 14:14:56+0530)
    Maven home: /usr/local/apache-maven-3.0.4
    Java version: 1.6.0_24, vendor: Sun Microsystems Inc.
    Java home: /usr/lib/jvm/jdk-6u32/jre
    Default locale: en_US, platform encoding: UTF-8
    OS name: "linux", version: "3.2.0-27-generic", arch: "amd64", family: "unix"
    

Saturday, August 4, 2012

Installing Apache Thrift on Ubuntu

In a previous post I wrote how to install Apache thrift on Windows. In this post I will guide you how to install Apache Thrift on Ubuntu 12.04.
  1. Install dependencies using the following command
    sudo apt-get install libboost-dev libboost-test-dev libboost-program-options-dev libevent-dev automake libtool flex bison pkg-config g++ libssl-dev
    
  2. Download tar.gz archive from the this link, extract it in your home directory using this command
    tar -xvzf thrift-0.8.0.tar.gz
    
  3. Change into the Thrift installation directory(the one extracted) and carry on the following command
    ./configure
    
  4. Run the following command within Thrift installation directory
    make
    
  5. After that carry on the following command
    sudo make install
    
  6. To verify Thrift has installed properly, use the following command
    thrift -version 
    

Friday, August 3, 2012

Installing Apache Cassandra on Ubuntu

Apache Cassandra is a distributed, extremely scalable, highly available and fault tolerant NoSQL database initiated by facebook, later open sourced as an apache project. Cassandra data model is inspired by Google Bigtable and it's distribution model is inspired by Amazon Dynamo. If you are interested to know more about Cassandra you can refer to the paper written by Facebook.

This post will guide you how to install Cassandra on Ubuntu 12.04.
  1. Install the new updates using following commands
    sudo apt-get update
    sudo apt-get upgrade
    
  2. open /etc/apt/sources.list using the following command
    sudo gedit /etc/apt/sources.list
    
    and add the following lines to it
    deb http://www.apache.org/dist/cassandra/debian 10x main
    deb-src http://www.apache.org/dist/cassandra/debian 10x main
    
  3. Run update again and you will get the following error. This means you need to add the PUBLIC_KEY. In next step you will understand how to add this PUBLIC_KEY.
    GPG error: http://www.apache.org unstable Release: The following signatures couldn't be verified because the public key is not available: NO_PUBKEY 4BD736A82B5C1B00
    
  4. Register and add a PUBLIC_KEY key and update again, note that you may need to change the key accordingly
    gpg --keyserver wwwkeys.pgp.net --recv-keys 4BD736A82B5C1B00
    sudo apt-key add ~/.gnupg/pubring.gpg
    sudo apt-get update
    
  5. Install Cassandra using the following command
    sudo apt-get install cassandra
    
  6. Start Cassandra server using the following command
    sudo cassandra -f
    
    After starting the Cassandra server you will see it has started listening for thrift clients.
    ....
    ....
    ....
    INFO 12:18:29,140 Listening for thrift clients...
    
  7. To stop Cassandra server process first find the Process ID for Cassandra and kill it.

    To find the process ID use following command
    ps auwx | grep cassandra
    
    Output will be something like this. According to that 3595 is the process ID for cassandra.
    root      3595  0.0  0.0  60048  1908 pts/0    S+   12:18   0:00 sudo cassandra -f
    
    To kill the process use the following command
    sudo kill <pid>
    
    After killing the process you will see Cassandra server has stopped listening to thrift clients.
    INFO 13:04:08,663 Stop listening to thrift clients
    INFO 13:04:08,666 Waiting for messaging service to quiesce
    INFO 13:04:08,667 MessagingService shutting down server thread.
    
  8. Use following command to start Cassandra as a service
    sudo /etc/init.d/cassandra start
    
  9. Use following command to stop Cassandra service
    sudo /etc/init.d/cassandra stop
    
Installation will create following directories. Uses of them are mentioned within the brackets.
  • /var/lib/cassandra (data directories)
  • /var/log/cassandra (log directory)
  • /var/run/cassandra (runtime files)
  • /usr/share/cassandra (environment settings)
  • /usr/share/cassandra/lib (JAR files)
  • /usr/bin (binary files)
  • /usr/sbin
  • /etc/cassandra (configuration files)
  • /etc/init.d (service startup script)
  • /etc/security/limits.d (cassandra user limits)
  • /etc/default
Installing JNA (Java Native Access) on Linux platforms can improve Cassandra memory usage. To install JNA, download jna.jar from here and add it to /usr/share/cassandra/lib directory.

If you get the following error while you try to start a Cassandra server, means that cassandra is already running in the background somewhere. You will need to kill the process that is running in the background first. You can probably use the above mentioned stop command to stop any Cassandra servers running background.
Error: Exception thrown by the agent : java.rmi.server.ExportException: Port already in use: 7199; nested exception is: 
 java.net.BindException: Address already in use
Here I have done the packaged installation, alternatively you can install Cassandra binary tarball installation on Ubuntu. Use this link for that.

References

Official Package To Install On Debian(tm) (not a product of Debian(tm))

Thursday, July 12, 2012

JMS with ActiveMQ

JMS short for Java Message Service provides a mechanism for integrating applications in a loosely coupled, flexible manner. JMS delivers data asynchronously across applications on a store and forward basis. Applications communicate through MOM(Message Oriented Middleware) which acts as an intermediary without communicating directly.

JMS Architecture

Main components of JMS are:
  • JMS Provider: A messaging system that implements the JMS interfaces and provides administrative and control features
  • Clients: Java applications that send or receive JMS messages. A message sender is called the Producer, and the recipient is called a Consumer
  • Messages: Objects that communicate information between JMS clients
  • Administered objects: Preconfigured JMS objects created by an administrator for the use of clients.
There are several JMS providers available like Apache ActiveMQ and OpenMQ. Here I have used Apache ActiveMQ.

Installing and starting Apache ActiveMQ on windows
  1. Download ActiveMQ windows binary distribution
  2. Extract the it to a desired location
  3. Using the command prompt change the directory to the bin folder inside ActiveMQ installation folder and run the following command to start ActiveMQ
  4. activemq
After starting ActiveMQ you can visit the admin console using http://localhost:8161/admin/ and do the administrative tasks

JMS Messaging Models

JMS has two messaging models, point to point messaging model and publisher subscriber messaging model.

Point to point messaging model

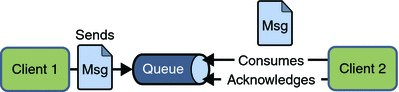
Producer sends the message to a specified queue within JMS provider and the only one of the consumers who listening to that queue receives that message.

Image courtesy Oracle
Point to Point Model Example

Example 1 and example 2 are almost similar the only difference is example 1 creates queues within the program and the example 2 uses jndi.properties file for naming look ups and creating queues.

Example 1
package com.eviac.blog.jms;

import javax.jms.*;
import javax.naming.InitialContext;
import javax.naming.NamingException;

import org.apache.log4j.BasicConfigurator;

public class Producer {

 public Producer() throws JMSException, NamingException {

  // Obtain a JNDI connection
  InitialContext jndi = new InitialContext();

  // Look up a JMS connection factory
  ConnectionFactory conFactory = (ConnectionFactory) jndi
    .lookup("connectionFactory");
  Connection connection;

  // Getting JMS connection from the server and starting it
  connection = conFactory.createConnection();
  try {
   connection.start();

   // JMS messages are sent and received using a Session. We will
   // create here a non-transactional session object. If you want
   // to use transactions you should set the first parameter to 'true'
   Session session = connection.createSession(false,
     Session.AUTO_ACKNOWLEDGE);

   Destination destination = (Destination) jndi.lookup("MyQueue");

   // MessageProducer is used for sending messages (as opposed
   // to MessageConsumer which is used for receiving them)
   MessageProducer producer = session.createProducer(destination);

   // We will send a small text message saying 'Hello World!'
   TextMessage message = session.createTextMessage("Hello World!");

   // Here we are sending the message!
   producer.send(message);
   System.out.println("Sent message '" + message.getText() + "'");
  } finally {
   connection.close();
  }
 }

 public static void main(String[] args) throws JMSException {
  try {
   BasicConfigurator.configure();
   new Producer();
  } catch (NamingException e) {
   e.printStackTrace();
  }

 }
}
package com.eviac.blog.jms;

import javax.jms.*;

import org.apache.activemq.ActiveMQConnection;
import org.apache.activemq.ActiveMQConnectionFactory;
import org.apache.log4j.BasicConfigurator;

public class Consumer {
 // URL of the JMS server
 private static String url = ActiveMQConnection.DEFAULT_BROKER_URL;

 // Name of the queue we will receive messages from
 private static String subject = "MYQUEUE";

 public static void main(String[] args) throws JMSException {
  BasicConfigurator.configure();
  // Getting JMS connection from the server
  ConnectionFactory connectionFactory = new ActiveMQConnectionFactory(url);
  Connection connection = connectionFactory.createConnection();
  connection.start();

  // Creating session for seding messages
  Session session = connection.createSession(false,
    Session.AUTO_ACKNOWLEDGE);

  // Getting the queue
  Destination destination = session.createQueue(subject);

  // MessageConsumer is used for receiving (consuming) messages
  MessageConsumer consumer = session.createConsumer(destination);

  // Here we receive the message.
  // By default this call is blocking, which means it will wait
  // for a message to arrive on the queue.
  Message message = consumer.receive();

  // There are many types of Message and TextMessage
  // is just one of them. Producer sent us a TextMessage
  // so we must cast to it to get access to its .getText()
  // method.
  if (message instanceof TextMessage) {
   TextMessage textMessage = (TextMessage) message;
   System.out.println("Received message '" + textMessage.getText()
     + "'");
  }
  connection.close();
 }
}
Example 2

jndi.properties
# START SNIPPET: jndi

java.naming.factory.initial = org.apache.activemq.jndi.ActiveMQInitialContextFactory

# use the following property to configure the default connector
java.naming.provider.url = vm://localhost

# use the following property to specify the JNDI name the connection factory
# should appear as. 
#connectionFactoryNames = connectionFactory, queueConnectionFactory, topicConnectionFactry

# register some queues in JNDI using the form
# queue.[jndiName] = [physicalName]
queue.MyQueue = example.MyQueue


# register some topics in JNDI using the form
# topic.[jndiName] = [physicalName]
topic.MyTopic = example.MyTopic

# END SNIPPET: jndi
package com.eviac.blog.jms;

import javax.jms.*;
import javax.naming.InitialContext;
import javax.naming.NamingException;

import org.apache.log4j.BasicConfigurator;

public class Producer {

 public Producer() throws JMSException, NamingException {

  // Obtain a JNDI connection
  InitialContext jndi = new InitialContext();

  // Look up a JMS connection factory
  ConnectionFactory conFactory = (ConnectionFactory) jndi
    .lookup("connectionFactory");
  Connection connection;

  // Getting JMS connection from the server and starting it
  connection = conFactory.createConnection();
  try {
   connection.start();

   // JMS messages are sent and received using a Session. We will
   // create here a non-transactional session object. If you want
   // to use transactions you should set the first parameter to 'true'
   Session session = connection.createSession(false,
     Session.AUTO_ACKNOWLEDGE);

   Destination destination = (Destination) jndi.lookup("MyQueue");

   // MessageProducer is used for sending messages (as opposed
   // to MessageConsumer which is used for receiving them)
   MessageProducer producer = session.createProducer(destination);

   // We will send a small text message saying 'Hello World!'
   TextMessage message = session.createTextMessage("Hello World!");

   // Here we are sending the message!
   producer.send(message);
   System.out.println("Sent message '" + message.getText() + "'");
  } finally {
   connection.close();
  }
 }

 public static void main(String[] args) throws JMSException {
  try {
   BasicConfigurator.configure();
   new Producer();
  } catch (NamingException e) {
   e.printStackTrace();
  }

 }
}
package com.eviac.blog.jms;

import javax.jms.*;
import javax.naming.InitialContext;
import javax.naming.NamingException;

import org.apache.log4j.BasicConfigurator;

public class Consumer {
 public Consumer() throws NamingException, JMSException {
  Connection connection;
  
  // Obtain a JNDI connection
  InitialContext jndi = new InitialContext();

  // Look up a JMS connection factory
  ConnectionFactory conFactory = (ConnectionFactory) jndi
    .lookup("connectionFactory");
  // Getting JMS connection from the server and starting it
  // ConnectionFactory connectionFactory = new
  // ActiveMQConnectionFactory(url);
  connection = conFactory.createConnection();

  // // Getting JMS connection from the server
  // ConnectionFactory connectionFactory = new
  // ActiveMQConnectionFactory(url);
  // Connection connection = connectionFactory.createConnection();
  try {
   connection.start();

   // Creating session for seding messages
   Session session = connection.createSession(false,
     Session.AUTO_ACKNOWLEDGE);

   // Getting the queue
   Destination destination = (Destination) jndi.lookup("MyQueue");

   // MessageConsumer is used for receiving (consuming) messages
   MessageConsumer consumer = session.createConsumer(destination);

   // Here we receive the message.
   // By default this call is blocking, which means it will wait
   // for a message to arrive on the queue.
   Message message = consumer.receive();

   // There are many types of Message and TextMessage
   // is just one of them. Producer sent us a TextMessage
   // so we must cast to it to get access to its .getText()
   // method.
   if (message instanceof TextMessage) {
    TextMessage textMessage = (TextMessage) message;
    System.out.println("Received message '" + textMessage.getText()
      + "'");
   }
  } finally {
   connection.close();
  }
 }

 public static void main(String[] args) throws JMSException {
  BasicConfigurator.configure();
  try {
   new Consumer();
  } catch (NamingException e) {
   // TODO Auto-generated catch block
   e.printStackTrace();
  }

 }
}

Publisher Subscriber Model

Publisher publishes the message to a specified topic within JMS provider and all the subscribers who subscribed for that topic receive the message. Note that only the active subscribers receive the message.

Image courtesy Oracle
Point to Point Model Example
package com.eviac.blog.jms;

import javax.jms.*;
import javax.naming.*;

import org.apache.log4j.BasicConfigurator;

import java.io.BufferedReader;
import java.io.InputStreamReader;

public class DemoPublisherSubscriberModel implements javax.jms.MessageListener {
 private TopicSession pubSession;
 private TopicPublisher publisher;
 private TopicConnection connection;

 /* Establish JMS publisher and subscriber */
 public DemoPublisherSubscriberModel(String topicName, String username,
   String password) throws Exception {
  // Obtain a JNDI connection
  InitialContext jndi = new InitialContext();

  // Look up a JMS connection factory
  TopicConnectionFactory conFactory = (TopicConnectionFactory) jndi
    .lookup("topicConnectionFactry");

  // Create a JMS connection
  connection = conFactory.createTopicConnection(username, password);

  // Create JMS session objects for publisher and subscriber
  pubSession = connection.createTopicSession(false,
    Session.AUTO_ACKNOWLEDGE);
  TopicSession subSession = connection.createTopicSession(false,
    Session.AUTO_ACKNOWLEDGE);

  // Look up a JMS topic
  Topic chatTopic = (Topic) jndi.lookup(topicName);

  // Create a JMS publisher and subscriber
  publisher = pubSession.createPublisher(chatTopic);
  TopicSubscriber subscriber = subSession.createSubscriber(chatTopic);

  // Set a JMS message listener
  subscriber.setMessageListener(this);

  // Start the JMS connection; allows messages to be delivered
  connection.start();

  // Create and send message using topic publisher
  TextMessage message = pubSession.createTextMessage();
  message.setText(username + ": Howdy Friends!");
  publisher.publish(message);

 }

 /*
  * A client can register a message listener with a consumer. A message
  * listener is similar to an event listener. Whenever a message arrives at
  * the destination, the JMS provider delivers the message by calling the
  * listener's onMessage method, which acts on the contents of the message.
  */
 public void onMessage(Message message) {
  try {
   TextMessage textMessage = (TextMessage) message;
   String text = textMessage.getText();
   System.out.println(text);
  } catch (JMSException jmse) {
   jmse.printStackTrace();
  }
 }

 public static void main(String[] args) {
  BasicConfigurator.configure();
  try {
   if (args.length != 3)
    System.out
      .println("Please Provide the topic name,username,password!");

   DemoPublisherSubscriberModel demo = new DemoPublisherSubscriberModel(
     args[0], args[1], args[2]);

   BufferedReader commandLine = new java.io.BufferedReader(
     new InputStreamReader(System.in));

   // closes the connection and exit the system when 'exit' enters in
   // the command line
   while (true) {
    String s = commandLine.readLine();
    if (s.equalsIgnoreCase("exit")) {
     demo.connection.close();
     System.exit(0);

    }
   }
  } catch (Exception e) {
   e.printStackTrace();
  }
 }
}
JMS programming model: Image Courtesy Oracle

Wednesday, July 4, 2012

Apache Thrift with Java quickstart

Apache Thrift is a RPC framework founded by facebook and now it is an Apache project. Thrift lets you define data types and service interfaces in a language neutral definition file. That definition file is used as the input for the compiler to generate code for building RPC clients and servers that communicate over different programming languages. You can refer Thrift white paper also.

According to the official web site Apache Thrift is a,
software framework, for scalable cross-language services development, combines a software stack with a code generation engine to build services that work efficiently and seamlessly between C++, Java, Python, PHP, Ruby, Erlang, Perl, Haskell, C#, Cocoa, JavaScript, Node.js, Smalltalk, OCaml and Delphi and other languages.
Image courtesy wikipedia

Installing Apache Thrift in Windows

Installation Thrift can be a tiresome process. But for windows the compiler is available as a prebuilt exe. Download thrift.exe and add it into your environment variables.

Writing Thrift definition file (.thrift file)

Writing the Thrift definition file becomes really easy once you get used to it. I found this tutorial quite useful to begin with.

Example definition file (add.thrift)
namespace java com.eviac.blog.samples.thrift.server  // defines the namespace 

typedef i32 int  //typedefs to get convenient names for your types

service AdditionService {  // defines the service to add two numbers
        int add(1:int n1, 2:int n2), //defines a method
}

Compiling Thrift definition file

To compile the .thrift file use the following command.
 
thrift --gen <language> <Thrift filename>
For my example the command is,
 
thrift --gen java add.thrift
After performing the command, inside gen-java directory you'll find the source codes which is useful for building RPC clients and server. In my example it will create a java code called AdditionService.java

Writing a service handler

Service handler class is required to implement the AdditionService.Iface interface.

Example service handler (AdditionServiceHandler.java)
 
package com.eviac.blog.samples.thrift.server;

import org.apache.thrift.TException;

public class AdditionServiceHandler implements AdditionService.Iface {

 @Override
 public int add(int n1, int n2) throws TException {
  return n1 + n2;
 }

}
Writing a simple server

Following is an example code to initiate a simple thrift server. To enable the multithreaded server uncomment the commented parts of the example code.

Example server (MyServer.java)
package com.eviac.blog.samples.thrift.server;

import org.apache.thrift.transport.TServerSocket;
import org.apache.thrift.transport.TServerTransport;
import org.apache.thrift.server.TServer;
import org.apache.thrift.server.TServer.Args;
import org.apache.thrift.server.TSimpleServer;

public class MyServer {

 public static void StartsimpleServer(AdditionService.Processor<AdditionServiceHandler> processor) {
  try {
   TServerTransport serverTransport = new TServerSocket(9090);
   TServer server = new TSimpleServer(
     new Args(serverTransport).processor(processor));

   // Use this for a multithreaded server
   // TServer server = new TThreadPoolServer(new
   // TThreadPoolServer.Args(serverTransport).processor(processor));

   System.out.println("Starting the simple server...");
   server.serve();
  } catch (Exception e) {
   e.printStackTrace();
  }
 }
 
 public static void main(String[] args) {
  StartsimpleServer(new AdditionService.Processor<AdditionServiceHandler>(new AdditionServiceHandler()));
 }

}

Writing the client

Following is an example java client code which consumes the service provided by AdditionService.

Example client code (AdditionClient.java)
package com.eviac.blog.samples.thrift.client;

import org.apache.thrift.TException;
import org.apache.thrift.protocol.TBinaryProtocol;
import org.apache.thrift.protocol.TProtocol;
import org.apache.thrift.transport.TSocket;
import org.apache.thrift.transport.TTransport;
import org.apache.thrift.transport.TTransportException;

public class AdditionClient {

 public static void main(String[] args) {

  try {
   TTransport transport;

   transport = new TSocket("localhost", 9090);
   transport.open();

   TProtocol protocol = new TBinaryProtocol(transport);
   AdditionService.Client client = new AdditionService.Client(protocol);

   System.out.println(client.add(100, 200));

   transport.close();
  } catch (TTransportException e) {
   e.printStackTrace();
  } catch (TException x) {
   x.printStackTrace();
  }
 }

}


Run the server code(MyServer.java). It should output following and will listen to the requests.
Starting the simple server...
Then run the client code(AdditionClient.java). It should output following.
300

Saturday, January 1, 2011

Writing a C# client to an Axis2 service

Before moving into today's post content I would like to wish all the readers a happy new year 2011!

I am writing this post assuming you already have read my previous post subjected "Getting started with Apache Axis2". In there the client code has written in java, assume a situation where you need to write a client with C#, it is even simpler than writing a client in java.All you have to do is create a new project using microsoft visual studio and add the wsdl of your service(for the given example it is http://localhost:8080/axis2/services/mywebservice?wsdl) as service references and give a desired name for it(in following sample client code it is webserviceref), write the client code and run it


Client.cs

using System;
using System.Collections.Generic;
using System.Linq;
using System.Text;
using webservice.clients.webserviceref;//name space of the service reference

namespace webservice.clients
{
    class Myclient
    {
        static void Main(string[] args)
        {

            webserviceref.mywebservicePortTypeClient cli = new mywebservicePortTypeClient("mywebserviceHttpSoap12Endpoint");
            Console.WriteLine(cli.sayHello("Hello"));
            Console.ReadLine();

        }
    }
}


Note that you have to start axis2 server before running the program.

Thursday, December 30, 2010

Getting started with Apache Axis2

I believe my previous post helped you to setup Apache Axis2 on windows. Now let's have a look at how to host a simple Web service with Apache Axis2.


Start an eclipse project and write a simple java class which will output a string "Hello!!!".

Sample1.java

package webservices.samples;

public class Sample1 {

 public String sayHello(String name) {

  return name;

 }

}


Inside src folder of your eclipse project create a new folder called META-INF and create a new file called services.xml in it.


 webservices.samples.Sample1


The service element has information about one service, inside service element specify the full qualified class name of your webservice (in this case it is webservices.samples.Sample1). In the child element of service element set the attribute name to the operation name you need to invoke through webservice (in this case it is sayHello)


Using Eclipse build the project and export only the relevant package and the META-INF inside bin folder as an archive file(.aar) to the repository\services folder inside axis2 home folder.


Start Axis2 server by double clicking on axis2server.bat inside bin folder. Now it will show deploying your service.


Now fire up a web browser and paste the following address in address bar http://localhost:8080/axis2/services/. It will list down the deployed services. Now your service should also be in that list.


Generating client to access the service

Goto bin folder inside axis2 home folder using command prompt and run the following command.

wsdl2Java.bat -uri http://localhost:8080/axis2/services/mywebservice?wsdl -o C:\myfile -uw

now go to C:\myfile folder using command prompt and give the following command

ant

Make sure you have set Apache ant bin folder to environment variable path before using this command. It will create a folder called build inside it there will be a folder called lib and mywebservice-test-client.jar will be generated inside it. You must use mywebservice-test-client.jar as an external jar file in your client project. Not only that jar you must add another set of external jar files in to your client project. All those jar files reside in lib folder inside axis2 home. Here I have list them out.


axis2-kernel-1.5.jar
axiom-api-1.2.8.jar
axiom-dom-1.2.8.jar
axiom-impl-1.2.8.jar
commons-logging-1.1.1.jar
wsdl4j-1.6.2.jar
XmlSchema-1.4.3.jar
neethi-2.0.4.jar
axis2-transport-local-1.5.jar
axis2-transport-http-1.5.jar
commons-httpclient-3.1.jar
mail-1.4.jar
commons-fileupload-1.2.jar
woden-api-1.0M8.jar
woden-impl-dom-1.0M8.jar
httpcore-4.0.jar
commons-codec-1.3.jar
geronimo-stax-api_1.0_spec-1.0.1.jar
wstx-asl-3.2.4.jar
axis2-jaxws-1.5.jar
axis2-adb-1.5.4.jar

Now you can write the client code. Build the project and run it. Make sure you have started axis2 server when you run the client.


Cilent.java
package webclient.samples;

import webservices.samples.MywebserviceStub;

public class Client {
 
 public static void main(String args[]){

 try {
 MywebserviceStub stub =new MywebserviceStub("http://localhost:8080/axis2/services/mywebservice");
 System.out.println(stub.sayHello("Hello"));
 }catch (Exception e){
 }
 
 }

}


Note: in axis2 home inside conf folder there is axis2.xml file open it and set hotupdate="true", this will auto update axis2 service whenever you update an already deployed service without restarting the axis2 service.

Setting up Apache Axis2 on windows

Download Apache Axis2 and extract the downloaded zip file to a desired location.


Make two new environment variables set first one's variable name as AXIS2_HOME and variable value as path to Axis2 home folder(in my case it is C:\Users\thilini\Desktop\axis2-1.5.4) and second one's variable name as JAVA_HOME and variabale value as path to Java home folder(in my case it is C:\Program Files\Java\jdk1.6.0_16).


Goto bin folder inside Axis2 home folder and double click on axis2server.bat file to start Axis2 service.


Now it's time to test whether installation is successful or not. Just fire up a web browser and paste the following address in address bar http://localhost:8080/axis2/services/. If installation is successful it will list down a service called "Version".