Showing posts with label java. Show all posts

Tuesday, November 25, 2014

Hadoop MapReduce Features : Custom Data Types

Hadoop requires every data type to be used as keys to implement Writable and Comparable interfaces and every data type to be used as values to implement Writable interface.

Writable interface

Writable interface provides a way to serialize and deserialize data, across network. Located in org.apache.hadoop.io package.
public interface Writable {
   void write(DataOutput out) throws IOException;
   void readFields(DataInput in) throws IOException;
}

Comparable interface

Hadoop uses Java's Comparable interface to facilitate the sorting process. Located in java.lang package.
public interface Comparable<T> {
   public int compareTo(T o);
}
WritableComparable interface

For convenience Hadoop provides a WritableComparable interface which wraps both Writable and Comparable interfaces to a single interface. Located in org.apache.hadoop.io package.
public interface WritableComparable<T> extends Writable, Comparable<T> {
}
Hadoop provides a set of classes; Text, IntWritable, LongWritable, FloatWritable, BooleanWritable etc..., which implement WritableComparable interface, and therefore can be straightly used as key and value types.

Custom Data Types

Example

Assume you want an object representation of a vehicle to be the type of your key or value. Three properties of a vehicle has taken in to consideration.
  1. Manufacturer
  2. Vehicle Identification Number(VIN)
  3. Mileage
Note that the Vehicle Identification Number(VIN) is unique for each vehicle.

A tab delimited file containing the observations of these three variables contains following sample data in it.

Sample Data
Toyota 1GCCS148X48370053 10000
Toyota 1FAPP64R1LH452315 40000
BMW WP1AA29P58L263510 10000
BMW JM3ER293470820653 60000
Nissan 3GTEC14V57G579789 10000
Nissan 1GNEK13T6YJ290558 25000
Honda 1GC4KVBG6AF244219 10000
Honda 1FMCU5K39AK063750 30000
Custom Value Types

Hadoop provides the freedom of creating custom value types by implementing the Writable interface. Implementing the writable interface one should implement its two abstract methods write() and readFields(). In addition to that, in the following example java code, I have overridden the toString() method to return the text representation of the object.
package net.eviac.blog.datatypes.value;

import java.io.DataInput;
import java.io.DataOutput;
import java.io.IOException;
import org.apache.hadoop.io.Writable;

/**
 * @author pavithra
 * 
 * Custom data type to be used as a value in Hadoop.
 * In Hadoop every data type to be used as values must implement Writable interface.
 *
 */
public class Vehicle implements Writable {

  private String model;
  private String vin;
  private int mileage;

  public void write(DataOutput out) throws IOException {
    out.writeUTF(model);
    out.writeUTF(vin);
    out.writeInt(mileage);
  }

  public void readFields(DataInput in) throws IOException {
    model = in.readUTF();
    vin = in.readUTF();
    mileage = in.readInt();
  }

  @Override
  public String toString() {
    return model + ", " + vin + ", "
        + Integer.toString(mileage);
  }

  public String getModel() {
    return model;
  }
  public void setModel(String model) {
    this.model = model;
  }
  public String getVin() {
    return vin;
  }
  public void setVin(String vin) {
    this.vin = vin;
  }
  public int getMileage() {
    return mileage;
  }
  public void setMileage(int mileage) {
    this.mileage = mileage;
  }
  
}
Following MapReduce job, outputs total Mileage per Manufacturer, with using Vehicle as a custom value type.
package net.eviac.blog.datatypes.jobs;

import java.io.IOException;

import net.eviac.blog.datatypes.value.Vehicle;

import org.apache.hadoop.conf.Configuration;
import org.apache.hadoop.fs.Path;
import org.apache.hadoop.io.IntWritable;
import org.apache.hadoop.io.Text;
import org.apache.hadoop.mapreduce.Job;
import org.apache.hadoop.mapreduce.Mapper;
import org.apache.hadoop.mapreduce.Reducer;
import org.apache.hadoop.mapreduce.lib.input.FileInputFormat;
import org.apache.hadoop.mapreduce.lib.output.FileOutputFormat;
import org.apache.log4j.BasicConfigurator;
import org.apache.log4j.Logger;

/**
 * @author pavithra
 *
 */
public class ModelTotalMileage {
  
  static final Logger logger = Logger.getLogger(ModelTotalMileage.class);

  public static class ModelMileageMapper
  extends Mapper<Object, Text, Text, Vehicle>{

    private Vehicle vehicle = new Vehicle();
    private Text model = new Text();

    public void map(Object key, Text value, Context context
        ) throws IOException, InterruptedException {

      String var[] = new String[6];
      var = value.toString().split("\t"); 

      if(var.length == 3){
        model.set(var[0]);
        vehicle.setModel(var[0]);
        vehicle.setVin(var[1]);
        vehicle.setMileage(Integer.parseInt(var[2]));
        context.write(model, vehicle);
      }
    }
  }

  public static class ModelTotalMileageReducer
  extends Reducer<Text,Vehicle,Text,IntWritable> {
    private IntWritable result = new IntWritable();

    public void reduce(Text key, Iterable<Vehicle> values,
        Context context
        ) throws IOException, InterruptedException {
      int totalMileage = 0;
      for (Vehicle vehicle : values) {
        totalMileage += vehicle.getMileage();
      }
      result.set(totalMileage);
      context.write(key, result);
    }
  }

  public static void main(String[] args) throws Exception {
    BasicConfigurator.configure();
    Configuration conf = new Configuration();
    Job job = Job.getInstance(conf, "Model Total Mileage");
    job.setJarByClass(ModelTotalMileage.class);
    job.setMapperClass(ModelMileageMapper.class);
    job.setReducerClass(ModelTotalMileageReducer.class);
    job.setOutputKeyClass(Text.class);
    job.setMapOutputValueClass(Vehicle.class);
    job.setOutputValueClass(IntWritable.class);
    FileInputFormat.addInputPath(job, new Path(args[0]));
    FileOutputFormat.setOutputPath(job, new Path(args[1]));
    System.exit(job.waitForCompletion(true) ? 0 : 1);
  }

}
Output
BMW 70000
Honda 40000
Nissan 35000
Toyota 50000
Custom Key Types

Hadoop provides the freedom of creating custom key types by implementing the WritableComparable interface. In addition to using Writable interface, so they can be transmitted over the network, keys must implement Java's Comparable interface to facilitate the sorting process. Since outputs are sorted on keys by the framework, only the data type to be used as keys must implement Comparable interface.

Implementing Comparable interface a class should implement its abstract method compareTo(). A Vehicle object must be able to be compared to other vehicle objects, to facilitate the sorting process. Sorting process uses compareTo(), to determine how Vehicle objects should be sorted. For an instance, since VIN is a String and String implements Comparable, we can sort vehicles by VIN.

For partitioning process, it is important for key types to implement hashCode() as well, thus should override the equals() as well. hashCode() should use the same variable as equals() which in our case is VIN. If equals() method says two Vehicle objects are equal if they have the same VIN, Vehicle objects with the same VIN will have to return identical hash codes.

Following example provides a java code for complete custom key type.
package net.eviac.blog.datatypes.key;

import java.io.DataInput;
import java.io.DataOutput;
import java.io.IOException;

import org.apache.hadoop.io.WritableComparable;

/**
 * @author pavithra
 * 
 * Custom data type to be used as a key in Hadoop.
 * In Hadoop every data type to be used as keys must implement WritableComparable interface.
 *
 */
public class Vehicle implements WritableComparable<Vehicle> {

  private String model;
  private String vin;
  private int mileage;

  public void write(DataOutput out) throws IOException {
    out.writeUTF(model);
    out.writeUTF(vin);
    out.writeInt(mileage);
  }

  public void readFields(DataInput in) throws IOException {
    model = in.readUTF();
    vin = in.readUTF();
    mileage = in.readInt();
  }

  @Override
  public String toString() {
    return model + ", " + vin + ", "
        + Integer.toString(mileage);
  }
  
  public int compareTo(Vehicle o) {
    return vin.compareTo(o.getVin());
  } 
  
  @Override
  public boolean equals(Object obj) {
    if((obj instanceof Vehicle) && (((Vehicle)obj).getVin().equals(vin))){
      return true;
    }else {
      return false;
    }    
  }
  
  @Override
  public int hashCode() {
    int ascii = 0;
    for(int i=1;i<=vin.length();i++){
      char character = vin.charAt(i);
      ascii += (int)character;
    }
    return ascii;
  }

  public String getModel() {
    return model;
  }
  public void setModel(String model) {
    this.model = model;
  }
  public String getVin() {
    return vin;
  }
  public void setVin(String vin) {
    this.vin = vin;
  }
  public int getMileage() {
    return mileage;
  }
  public void setMileage(int mileage) {
    this.mileage = mileage;
  }  
  
}
Following MapReduce job, outputs Mileage per vehicle, with using Vehicle as a custom key type.
package net.eviac.blog.datatypes.jobs;

import java.io.IOException;

import net.eviac.blog.datatypes.key.Vehicle;

import org.apache.hadoop.conf.Configuration;
import org.apache.hadoop.fs.Path;
import org.apache.hadoop.io.IntWritable;
import org.apache.hadoop.io.Text;
import org.apache.hadoop.mapreduce.Job;
import org.apache.hadoop.mapreduce.Mapper;
import org.apache.hadoop.mapreduce.Reducer;
import org.apache.hadoop.mapreduce.lib.input.FileInputFormat;
import org.apache.hadoop.mapreduce.lib.output.FileOutputFormat;
import org.apache.log4j.BasicConfigurator;
import org.apache.log4j.Logger;

/**
 * @author pavithra
 *
 */
public class VehicleMileage {
  
  static final Logger logger = Logger.getLogger(VehicleMileage.class);

  public static class VehicleMileageMapper
  extends Mapper<Object, Text, Vehicle, IntWritable>{

    private Vehicle vehicle = new Vehicle();
    private IntWritable mileage = new IntWritable();

    public void map(Object key, Text value, Context context
        ) throws IOException, InterruptedException {

      String var[] = new String[6];
      var = value.toString().split("\t"); 

      if(var.length == 3){
        mileage.set(Integer.parseInt(var[2]));
        vehicle.setModel(var[0]);
        vehicle.setVin(var[1]);
        vehicle.setMileage(Integer.parseInt(var[2]));
        context.write(vehicle, mileage);
      }
    }
  }

  public static class VehicleMileageReducer
  extends Reducer<Vehicle,IntWritable,Text,IntWritable> {
    private IntWritable result = new IntWritable();
    private Text vin = new Text();

    public void reduce(Vehicle key, Iterable<IntWritable> values,
        Context context
        ) throws IOException, InterruptedException {
      int totalMileage = 0;
      for (IntWritable mileage : values) {
        totalMileage += mileage.get();
      }
      result.set(totalMileage);
      vin.set(key.getVin());
      context.write(vin, result);
    }
  }

  public static void main(String[] args) throws Exception {
    BasicConfigurator.configure();
    Configuration conf = new Configuration();
    Job job = Job.getInstance(conf, "Model Total Mileage");
    job.setJarByClass(VehicleMileage.class);
    job.setMapperClass(VehicleMileageMapper.class);
    job.setReducerClass(VehicleMileageReducer.class);
    job.setMapOutputKeyClass(Vehicle.class);
    job.setOutputKeyClass(Text.class);    
    job.setOutputValueClass(IntWritable.class);
    FileInputFormat.addInputPath(job, new Path(args[0]));
    FileOutputFormat.setOutputPath(job, new Path(args[1]));
    System.exit(job.waitForCompletion(true) ? 0 : 1);
  }

}
Output
1FAPP64R1LH452315 40000
1FMCU5K39AK063750 30000
1GC4KVBG6AF244219 10000
1GCCS148X48370053 10000
1GNEK13T6YJ290558 25000
3GTEC14V57G579789 10000
JM3ER293470820653 60000
WP1AA29P58L263510 10000

Saturday, November 1, 2014

Getting started with Hadoop MapReduce

Hadoop MapReduce framework provides a way to process large data, in parallel, on large clusters of commodity hardware.

[Processing a large file serially from top to bottom could be a very time consuming task, instead, in brief, MapReduce breaks that large file into chunks and processes in parallel.]

A little note on HDFS

HDFS, Hadoop Distributed File System, is a fault tolerant, distributed storage, which is responsible for storing large data, on large clusters of commodity hardware.

HDFS splits data into chunks which are called blocks and stores them across multiple nodes within the cluster. HDFS distributes these blocks across different nodes, if possible. A typical block size in HDFS is 64 MB(you can configure this value using dfs.blocksize property within hdfs-default.xml file). Note that changing this setting will not affect the block size of any files currently in HDFS. It will only affect the block size of files placed into HDFS after this setting has taken effect. All blocks in a file except the last block are of the same size. Each block is given a unique name which is in the form of blk_<large number>. Each block is replicated, by default 3 times(you can configure this value using dfs.replication property within hdfs-default.xml file) across different nodes to ensure availability.

Suppose we have a file of size 160MB, as the file is loaded into HDFS, it splits into 3 blocks. The first block and the second block is of 64MB in size and the third one is of 32MB in size, to makeup 160MB file.

NameNode

NameNode keeps metadata of HDFS files, it does not store data itself. NameNode daemon runs on a Master node and there is only one NameNode per Hadoop cluster. NameNode runs on a seperate JVM process, in a typical production cluster there is a separate node which runs NameNode process.

NameNode does not store the location for each block, they are acquired from each DataNode at cluster startup , and keep them in memory and persisted to a file in its namespace called 'fsimage'. Changes during operations are stored in memory and logged into a file called 'edit', which is also in the NameNode's namespace. The SecondaryNameNode is a daemon process, which does housekeeping functions for NameNode, periodically merge 'fsimage' with 'edits'.

Since there is a single NameNode per Hadoop cluster, it is a single point of failure. If the NameNode becomes unavailable, the entire cluster becomes inaccessible. You may have noticed DataNodes does not contain metadata of the data blocks, but only actual data blocks. Therefore losing the NameNode makes entire cluster inaccessible and useless.

If 'fsimage' and 'edits' files get corrupted, all the data in HDFS becomes inaccessible. Even though a bunch of commodity machines(JBOD) can be used for DataNodes, more reliable RAID-based storage must be used for NameNodes to assure reliability. Also 'fsimage' and 'edits' files must regularly be backed up.

Hadoop prefers large files over a large number of small files. Since only the data of one file can be stored in a data block, if there are a large number of small files present, they have to be stored in different separate data blocks, which in turn results a huge number of data blocks. During cluster operations, NameNode pulls all the metadata of these data blocks and stores them in memory. Which can simply overwhelm the NameNode.

DataNode

DataNodes daemons which run on slave nodes, store HDFS blocks. There is only one DataNode process runs per slave node. DataNodes also run on seperate JVM processes. DataNodes periodically send heartbeats to the NameNode to indicate they are alive. DataNodes also can talk to each other, for an instance they talk to each other during data replication.

When a client wants to perform an operation on a file, it first contacts NameNode to locate that file. NameNode then sends the locations of nodes that file is stored on as HDFS blocks. Client can then directly talk to DataNodes and perform the operation the file.

Daemons of MapReduce

There are two daemon processes we have to look into; JobTracker daemon and TaskTracker daemon.

JobTracker

JobTracker daemon which runs on a master node, tracks MapReduce jobs. There is only one JobTracker daemon per Hadoop cluster. JobTracker runs on a seperate JVM process, in a typical production cluster there is a separate node which runs JobTracker process.

TaskTracker

TaskTracker daemons which run on slave nodes, handles tasks(map, reduce) recieved from the JobTracker. There is only one TaskTracker per slave node. Every TaskTracker is setup with a set of slots which specifies the number of tasks it can handle(A TaskTracker can configured to handle multiple map and reduce tasks). TaskTracker starts up separate JVM processes for each task to isolate it from the problems caused by tasks. DataNodes periodically send heartbeats to the JobTracker to indicate they are alive and to inform the number of available slots.

Running a MapReduce job, client application submits jobs to the JobTracker. JobTracker then talks to the NameNode to locate necessary data blocks. Then the JobTracker choose TaskTrackers with free slots, which runs on the same nodes which contains data or within the same rack as data. TaskTrackers then start separate JVM processes for each task(can also use JVM Reuse), and monitor them, while the JobTracker monitors TaskTrackers for failures. When a task is done TaskTracker informs the JobTracker.

Both HDFS and MapReduce framework run on the same set of nodes, in other words storage nodes(DataNodes in HDFS) and compute nodes(nodes which TaskTrackers run on) are the same. In Hadoop computations are moved to the data, not the other way around.

Input Split

Input split is a chunk of an input that is processed by a single map. Each map is responsible for processing a single Input Split. An Input Split has a length in bytes and a set of storage locations. Input Split doesn't contain the input data, but a reference to the data. In other words, an Input Split is logical and has a reference to the input data which are physically stored in HDFS as HDFS blocks.

Hadoop uses InputSplit Java interface, which is in the org.apache.hadoop.mapred package, to represent an Input Split.


public interface InputSplit extends Writable {

  long getLength() throws IOException;
          
  String[] getLocations() throws IOException;

}

Records

Each Input Split is divided into Records, within a map task. Records are Key/Value pairs and logical. Map task processes each Record,one after the other.

InputFormat

InputSplit s are generated using an interface, InputFormat, which is in the org.apache.hadoop.mapred package.

public interface InputFormat<K, V> {
          
  InputSplit[] getSplits(JobConf job, int numSplits) throws IOException;
          
  RecordReader<K, V> getRecordReader(InputSplit split,
                                     JobConf job, 
                                     Reporter reporter) throws IOException;
}

An InputFormat does two tings,
  1. Generating Input Splits.
  2. Dividing Input Splits into Records.
getSplits() method is invoked by the client to generate input splits, and the generated splits are submitted to the JobTracker. JobTracker uses the locations of the splits to choose TaskTrackres and assign splits to them. TakTrackers schedule map tasks to process the Input Splits(one map task for one split). Map Task calls getRecordReader() method on the Input Split to acquire a RecordReader. Map task then uses RecordReader to generate record key/value pairs, which map task later passes to the map() function.

FileInputFormat

FileInputFormat is the base class for all file-based InputFormats, which extends InputFormat interface. This does two things;
  1. Defining input paths for a MapReduce job.
  2. Giving an implementation for generating splits for the input files.
Note that dividing splits into records, which is not happening here, are performed by the sub classes. By default the Input Split size for FileInputFormat is the size of an HDFS block, therefore by default FileInputFormat splits files larger than an HDFS block. Note that it is possible to change these default configurations using the properties listed below;
  1. mapred.min.split.size
  2. mapred.max.split.size
  3. dfs.block.size
Note that FileInputFormat can override the isSplitable(FileSystem, Path) method to return FALSE, to ensure input files are non-splittable and processed as a whole.

Inputs and Outputs

MapReduce framework operates on a series of Key/Value transformations, where input to a MapReduce job is a set of {key, value} pairs and output is also a set of {key, value} pairs. Note that types of input {key, value} pairs possibly could be different from types of output {key, value} pairs.
(input) {k1, v1} -> map -> {k2, List(v2)} -> reduce -> {k3, v3} (output)
Every data type to be used as keys must implement Writable and Comparable interfaces and every data type to be used as values must implement Writable interface. Writable interface provides a way to serialize and deserialize data, across network. Since outputs are sorted on keys by the framework, to facilitate the sorting process, only the data type to be used as keys must implement Comparable interface.

WordCount - Example MapReduce Program

Following example MapReduce program is the exact same one that you will find in Hadoop MapReduce Tutorial. This code works with all three modes; Standalone mode, Pseudo-distributed mode and Fully-distributed mode.

import java.io.IOException;
import java.util.StringTokenizer;

import org.apache.hadoop.conf.Configuration;
import org.apache.hadoop.fs.Path;
import org.apache.hadoop.io.IntWritable;
import org.apache.hadoop.io.Text;
import org.apache.hadoop.mapreduce.Job;
import org.apache.hadoop.mapreduce.Mapper;
import org.apache.hadoop.mapreduce.Reducer;
import org.apache.hadoop.mapreduce.lib.input.FileInputFormat;
import org.apache.hadoop.mapreduce.lib.output.FileOutputFormat;

public class WordCount {

 public static class TokenizerMapper
 extends Mapper<Object, Text, Text, IntWritable>{

  private final static IntWritable one = new IntWritable(1);
  private Text word = new Text();

  public void map(Object key, Text value, Context context
    ) throws IOException, InterruptedException {
   StringTokenizer itr = new StringTokenizer(value.toString());
   while (itr.hasMoreTokens()) {
    word.set(itr.nextToken());
    context.write(word, one);
   }
  }
 }
 
 public static class IntSumReducer
 extends Reducer<Text,IntWritable,Text,IntWritable> {
  private IntWritable result = new IntWritable();

  public void reduce(Text key, Iterable<IntWritable> values,
    Context context
    ) throws IOException, InterruptedException {
   int sum = 0;
   for (IntWritable val : values) {
    sum += val.get();
   }
   result.set(sum);
   context.write(key, result);
  }
 }

 public static void main(String[] args) throws Exception {
// Creating a configuration object
  Configuration conf = new Configuration();
// Creating an instance of Job class
  Job job = Job.getInstance(conf, "word count");
// Setting the name of the main class within the jar file
  job.setJarByClass(WordCount.class);
// Setting the mapper class
  job.setMapperClass(TokenizerMapper.class);
 // Setting the combiner class
  job.setCombinerClass(IntSumReducer.class);
// Setting the reducer class
  job.setReducerClass(IntSumReducer.class);
// Setting the data type of the output(final) key
  job.setOutputKeyClass(Text.class);
// Setting the data type of the output(final) value
  job.setOutputValueClass(IntWritable.class);
// Setting input file path, the 1st argument passed in to the main method is used.
  FileInputFormat.addInputPath(job, new Path(args[0]));
// Setting output file path,the 2nd argument passed in to the main method is used.
  FileOutputFormat.setOutputPath(job, new Path(args[1]));
// Running the job and wait for it to get completed
  System.exit(job.waitForCompletion(true) ? 0 : 1);
 }
 
}

To perform a MapReduce job, we need a mapper implementation and a reducer implementation. As you can see in the above code, mapper and reducer classes are defined as inner classes. Also MapReduce job configuration happens within its main method, mainly with the use of an instance of Job class. You can go through the WordCount.java code and refer the comments I've added in there, to understand these configurations.

Mapper

In the WordCount example, you can see the mapper implementation is named as 'TokenizerMapper', which extends the base Mapper class provided by Hadoop and has overridden its map method. As you can see, map method has three parameters,
  1. Input key
  2. Input value
  3. An instance of the Context class, which is used to emit the results.
Mapper is executed once for each line of text, and in each time that line of text is broken into words, then it emits a series of new key/value pairs of the form {word,1} using the 'context' object.

Partitioning, Shuffle and Sort

Partitioning

Hadoop ensures that all intermediate records with the same key end up in the same reducer. The default partitioner used by MapReduce framework is HashPartitioner.

Shuffle and Sort

MapReduce ensures that the input to a reducer is sorted by key. The shuffle and sort phases occur simultaneously. It's the process of performing sort and transferring intermediate mapper outputs to the reducers as inputs. As the outputs are fetched by the reducer, they get merged.

Combiner

Hadoop allows the use of an optional Combiner class to run on mapper outputs. Specifying a Combiner class, each mapper output will go through a local Combiner and will perform sorting on keys, local aggregation on them. Combiner output creates the input to the reducer. Combiner class is an optimization, so there is no guarantee of how many times it will run on a mapper output, it could be zero, one or more times. Therefore we must be absolutely sure when specifying a Combiner, that the job will produce the same output from reducer regardless of how many times the Combiner runs on a mapper output. WordCount example has specified a combiner which is same as the reducer.

Reducer

In the WordCount example, you can see the reducer implementation is named as 'IntSumReducer', which extends the base Reducer class provided by Hadoop and has overridden its reduce method. As you can see, reduce method has three parameters,
  1. Input key
  2. Input list of values as an Iterable object
  3. An instance of the Context class, which is used to emit the results.
Note that each mapper emits a series of key/value pairs and in the intermediate shuffle and sort phase these individual key/value pairs get combined into a series of key/List(value) pairs, which inputs to the reducers. Reducer is executed once for each key(word). In the WordCount example reducer computes the sum of values in the Iterable object and emits the results for each word, as in the form of {word, sum}.

Let's take an example, assume we have two input files, one containing a word 'Hello World Bye World' and the other containing a word 'Bye World Bye' in it. In this particular case;

W/O Combiner

1st Mapper emits;
{Hello, 1}
{World, 1}
{Bye, 1} 
{World, 1}
2nd Mapper emits;
{Bye, 1}
{World, 1}
{Bye, 1} 
After shuffle and sort phase, inputs to the reducer;
{Bye, (1,1,1)} 
{Hello,1}
{World, (1,1,1)}
Reducer emits;
{Bye, 3} 
{Hello,1}
{World, 3}
With Combiner

1st Mapper emits;
{Hello, 1} 
{World, 1}
{Bye, 1} 
{World, 1}
2nd Mapper emits;
{Bye, 1}
{World, 1}
{Bye, 1} 
Combiner does a local aggregation and mapper outputs get sorted on keys;

For the 1st Mapper;
{Bye, 1} 
{Hello, 1}
{World, 2}
For the 2nd Mapper;
{Bye, 2}
{World, 1}
Reducer emits;
{Bye, 3} 
{Hello, 1}
{World, 3}

Running a MapReduce job

  1. Add hadoop classpath to your classpath using the following command.
    $export CLASSPATH=`hadoop classpath`:$CLASSPATH
    
  2. Now compile WordCount.java using the following command.
    $javac WordCount.java
    
  3. Create the job jar file.
    $jar cf wc.jar WordCount*.class
    
  4. If you are using Standalone mode to run the job, you can simply use the following command.
    $hadoop jar wc.jar WordCount input output
    
    As you can see there are four arguments to this command,
    1. Name of the jar file.
    2. Name of the main class within the jar file.
    3. The input file location in your local machine.

      Viewing the inputs
      $ls input
      ## file01 file02 
      
      $cat input/file01
      ## Hello World Bye World
      
      $cat input/file02
      ## Bye World Bye
      
    4. The output file location.
    To view the output, use the following command,
    $cat output/part-r-00000
    
    In a successful execution of the job, following should be the output.
    Bye 3
    Hello 1
    World 3
    
  5. If you are using Pseudo-distributed mode to run the job, First place the job jar into a desired location(I have used my HDFS home) on HDFS, using the following command.
    $hdfs dfs -put wc.jar /user/pavithra
    
    you can use the following command to run the job.
    $hadoop jar wc.jar WordCount input output
    
    As you can see there are four arguments to this command,
    1. Name of the jar file.
    2. Name of the main class within the jar file.
    3. The input file location in HDFS. This is relative to your home directory in HDFS. In my case, the full path to home directory would be /user/pavithra/input.

      Viewing the inputs
      $hdfs dfs -ls input
      ## file01 file02 
      
      $hdfs dfs -cat input/file01
      ## Hello World Bye World
      
      $hdfs dfs -cat input/file02
      ## Bye World Bye
      
    4. The output file location. This is also relative to your home directory in HDFS. The full path would be in my case, user/pavithra/output
    To view the output, use the following command,
    hdfs dfs -cat output/part-r-00000
    
    In a successful execution of the job following should be the output.
    Bye 3
    Hello 1
    World 3
    

Friday, November 8, 2013

RESTful Web Services with Java

REST stands for REpresentational State Transfer, was first introduced by Roy Fielding in his thesis "Architectural Styles and the Design of Network-based Software Architectures" in year 2000.

REST is an architectural style. HTTP is a protocol which contains the set of REST architectural constraints.

REST fundamentals
  • Everything in REST is considered as a resource.
  • Every resource is identified by an URI.
  • Uses uniform interfaces. Resources are handled using POST, GET, PUT, DELETE operations which are similar to Create, Read, update and Delete(CRUD) operations.
  • Be stateless. Every request is an independent request. Each request from client to server must contain all the information necessary to understand the request.
  • Communications are done via representations. E.g. XML, JSON

RESTful Web Services

RESTful Web Services have embraced by large service providers across the web as an alternative to SOAP based Web Services due to its simplicity. This post will demonstrate how to create a RESTful Web Service and client using Jersey framework which extends JAX-RS API. Examples are done using Eclipse IDE and Java SE 6.

Creating RESTful Web Service
  • In Eclipse, create a new dynamic web project called "RESTfulWS"
  • Download Jersey zip bundle from here. Jersey version used in these examples is 1.17.1. Once you unzip it you'll have a directory called "jersey-archive-1.17.1". Inside it find the lib directory. Copy following jars from there and paste them inside WEB-INF -> lib folder in your project. Once you've done that, add those jars to your project build path as well.
    1. asm-3.1.jar
    2. jersey-client-1.17.1.jar
    3. jersey-core-1.17.1.jar
    4. jersey-server-1.17.1.jar
    5. jersey-servlet-1.17.1.jar
    6. jsr311-api-1.1.1.jar
  • In your project, inside Java Resources -> src create a new package called "com.eviac.blog.restws". Inside it create a new java class called "UserInfo". Also include the given web.xml file inside WEB-INF folder.
  • UserInfo.java
     
    package com.eviac.blog.restws;
    
    import javax.ws.rs.GET;
    import javax.ws.rs.Path;
    import javax.ws.rs.PathParam;
    import javax.ws.rs.Produces;
    import javax.ws.rs.core.MediaType;
    
    /**
     * 
     * @author pavithra
     * 
     */
    
    // @Path here defines class level path. Identifies the URI path that 
    // a resource class will serve requests for.
    @Path("UserInfoService")
    public class UserInfo {
    
     // @GET here defines, this method will method will process HTTP GET
     // requests.
     @GET
     // @Path here defines method level path. Identifies the URI path that a
     // resource class method will serve requests for.
     @Path("/name/{i}")
     // @Produces here defines the media type(s) that the methods
     // of a resource class can produce.
     @Produces(MediaType.TEXT_XML)
     // @PathParam injects the value of URI parameter that defined in @Path
     // expression, into the method.
     public String userName(@PathParam("i") String i) {
    
      String name = i;
      return "<User>" + "<Name>" + name + "</Name>" + "</User>";
     }
     
     @GET 
     @Path("/age/{j}") 
     @Produces(MediaType.TEXT_XML)
     public String userAge(@PathParam("j") int j) {
    
      int age = j;
      return "<User>" + "<Age>" + age + "</Age>" + "</User>";
     }
    }
    
    web.xml
    <?xml version="1.0" encoding="UTF-8"?>  
    <web-app xmlns:xsi="http://www.w3.org/2001/XMLSchema-instance" xmlns="http://java.sun.com/xml/ns/javaee" xmlns:web="http://java.sun.com/xml/ns/javaee/web-app_2_5.xsd" xsi:schemaLocation="http://java.sun.com/xml/ns/javaee http://java.sun.com/xml/ns/javaee/web-app_2_5.xsd" id="WebApp_ID" version="2.5">  
      <display-name>RESTfulWS</display-name>  
      <servlet>  
        <servlet-name>Jersey REST Service</servlet-name>  
        <servlet-class>com.sun.jersey.spi.container.servlet.ServletContainer</servlet-class>  
        <init-param>  
          <param-name>com.sun.jersey.config.property.packages</param-name>  
          <param-value>com.eviac.blog.restws</param-value>  
        </init-param>  
        <load-on-startup>1</load-on-startup>  
      </servlet>  
      <servlet-mapping>  
        <servlet-name>Jersey REST Service</servlet-name>  
        <url-pattern>/rest/*</url-pattern>  
      </servlet-mapping>  
    </web-app>
    
  • To run the project, right click on it and click on run as ->run on server.
  • Execute the following URL in your browser and you'll see the output.
    http://localhost:8080/RESTfulWS/rest/UserInfoService/name/Pavithra
    
  • output
Creating Client
  • Create a package called "com.eviac.blog.restclient". Inside it create a java class called "UserInfoClient".
  • UserInfoClient.java
    package com.eviac.blog.restclient;
    
    import javax.ws.rs.core.MediaType;
    
    import com.sun.jersey.api.client.Client;
    import com.sun.jersey.api.client.ClientResponse;
    import com.sun.jersey.api.client.WebResource;
    import com.sun.jersey.api.client.config.ClientConfig;
    import com.sun.jersey.api.client.config.DefaultClientConfig;
    
    /**
     * 
     * @author pavithra
     * 
     */
    public class UserInfoClient {
    
     public static final String BASE_URI = "http://localhost:8080/RESTfulWS";
     public static final String PATH_NAME = "/UserInfoService/name/";
     public static final String PATH_AGE = "/UserInfoService/age/";
    
     public static void main(String[] args) {
    
      String name = "Pavithra";
      int age = 25;
    
      ClientConfig config = new DefaultClientConfig();
      Client client = Client.create(config);
      WebResource resource = client.resource(BASE_URI);
    
      WebResource nameResource = resource.path("rest").path(PATH_NAME + name);
      System.out.println("Client Response \n"
        + getClientResponse(nameResource));
      System.out.println("Response \n" + getResponse(nameResource) + "\n\n");
    
      WebResource ageResource = resource.path("rest").path(PATH_AGE + age);
      System.out.println("Client Response \n"
        + getClientResponse(ageResource));
      System.out.println("Response \n" + getResponse(ageResource));
     }
    
     /**
      * Returns client response.
      * e.g : 
      * GET http://localhost:8080/RESTfulWS/rest/UserInfoService/name/Pavithra 
      * returned a response status of 200 OK
      *
      * @param service
      * @return
      */
     private static String getClientResponse(WebResource resource) {
      return resource.accept(MediaType.TEXT_XML).get(ClientResponse.class)
        .toString();
     }
    
     /**
      * Returns the response as XML
      * e.g : <User><Name>Pavithra</Name></User> 
      * 
      * @param service
      * @return
      */
     private static String getResponse(WebResource resource) {
      return resource.accept(MediaType.TEXT_XML).get(String.class);
     }
    }
    
  • Once you run the client program, you'll get following output.
  • Client Response 
    GET http://localhost:8080/RESTfulWS/rest/UserInfoService/name/Pavithra returned a response status of 200 OK
    Response 
    <User><Name>Pavithra</Name></User>
    
    
    Client Response 
    GET http://localhost:8080/RESTfulWS/rest/UserInfoService/age/25 returned a response status of 200 OK
    Response 
    <User><Age>25</Age></User>
    
Enjoy!

Monday, August 20, 2012

Getting started with JAX-WS

JAX-WS stands for Java API for XML Web Services. It is a Java programming language API for creating web services and clients that communicate using XML. This post is a quick start for JAX-WS.

Prerequisites
GlassFish integrated with Eclipse.

Creating the JAX-WS Web Service
  1. In Eclipse create a Dynamic Web Project called "com.eviac.blog.jaxwsproj". Make GlassFish as the Target Runtime.
  2. Create a new class called "SampleWS" in the created project. This will be the implementation class of the web service.
    SampleWS.java
    package com.eviac.blog.jaxws.service;
    
    import javax.jws.WebMethod;
    import javax.jws.WebService;
    
    @WebService
    public class SampleWS {
    
     @WebMethod
     public int sum(int a, int b) {
      return a + b;
     }
    
     @WebMethod
     public int multiply(int a, int b) {
      return a * b;
     }
    
    }
    
    
  3. Open a terminal and navigate to the root of the project directory. Create a directory called wsdl inside WebContent/WEB-INF/. Use the following command to create web service artifacts. Make sure your JAVA_ HOME is set properly or this command will not work. Also make sure to build the project before running this command or it will complain class not found.
    wsgen -classpath build/classes/ -wsdl -r WebContent/WEB-INF/wsdl -s src -d build/classes/ com.eviac.blog.jaxws.service.SampleWS
    
  4. Refresh the project to discover created artifacts. Open the created WSDL-file inside wsdl folder. Search for REPLACE_WITH_ACTUAL_URL and replace it with the web service URL: http://localhost:8080/com.eviac.blog.jaxwsproj/SampleWSService, and save the file.
  5. Deploy the project in Glassfish by right-clicking the project, click Run As -> Run on Server and select the Glassfish server.
Creating the JAX-WS client
  1. Create a Java project in eclipse called "com.eviac.blog.jaxwsclientproj". Open up a new terminal and go to the project root. Use the following command to generate the classes you need to access the web service. Here you will need to use the URL of the WSDL file.
    wsimport -s src -d bin http://localhost:8080/com.eviac.blog.jaxwsproj/SampleWSService?wsdl
    
  2. Create a new class called "SampleWSClient" in the project.
    SampleWSClient.java
    package com.eviac.blog.jaxws.client;
    
    import javax.xml.ws.WebServiceRef;
    
    import com.eviac.blog.jaxws.service.SampleWS;
    import com.eviac.blog.jaxws.service.SampleWSService;
    
    public class SampleWSClient {
    
     @WebServiceRef(wsdlLocation = "http://localhost:8080/com.eviac.blog.jaxwsproj/SampleWSService?wsdl")
     private static SampleWSService Samplews;
    
     public static void main(String[] args) {
      SampleWSClient wsClient = new SampleWSClient();
      wsClient.run();
     }
    
     public void run() {
      Samplews = new SampleWSService();
      SampleWS port = Samplews.getSampleWSPort();
      System.out.println("multiplication Result= "+ port.multiply(10, 20));
      System.out.println("Addition Result= "+port.sum(10, 20));
     }
    
    }
    
  3. Right click on the project and click on Run As -> Java Application. This will result following.
    multiplication Result= 200
    Addition Result= 30
    

Friday, August 3, 2012

Installing Oracle java6 on Ubuntu

If you have already installed Ubuntu 12.04 you probably have realized that Sun java(oracle java) does not come prepacked with Ubuntu like it used to be , instead OpenJDK comes with it. Here is how you can install Oracle java on Ubuntu 12.04 manually.
  1. Download jdk-6u32-linux-x64.bin from this link. If you have used 32-bit Ubuntu installation, download jdk-6u32-linux-x32.bin instead.
  2. To make the downloaded bin file executable use the following command
    chmod +x jdk-6u32-linux-x64.bin
    
  3. To extract the bin file use the following command
    ./jdk-6u32-linux-x64.bin
    
  4. Using the following command create a folder called "jvm" inside /usr/lib if it is not already existing
    sudo mkdir /usr/lib/jvm
    
  5. Move the extracted folder into the newly created jvm folder
    sudo mv jdk1.6.0_32 /usr/lib/jvm/
    
  6. To install the Java source use following commands
    sudo update-alternatives --install /usr/bin/javac javac /usr/lib/jvm/jdk1.6.0_32/bin/javac 1
    sudo update-alternatives --install /usr/bin/java java /usr/lib/jvm/jdk1.6.0_32/bin/java 1
    sudo update-alternatives --install /usr/bin/javaws javaws /usr/lib/jvm/jdk1.6.0_32/bin/javaws 1
    
  7. To make this default java
    sudo update-alternatives --config javac
    sudo update-alternatives --config java
    sudo update-alternatives --config javaws
    
  8. To make symlinks point to the new Java location use the following command
    ls -la /etc/alternatives/java*
    
  9. To verify Java has installed correctly use this command
    java -version
    
  10. To set JAVA_HOME variable and add to your PATH open up /etc/bash.bashrc file using following command
    sudo gedit /etc/bash.bashrc 
    
  11. Now add the following lines to it.
    JAVA_HOME=/usr/lib/jvm/jdk1.6.0_32
    export JAVA_HOME
    PATH=$PATH:$JAVA_HOME/bin
    export PATH 
    
  12. After doing that open up a new terminal and run following commands to verify JAVA_HOME has set correctly.
    $echo $JAVA_HOME
    Should output this ---> /usr/lib/jvm/jdk1.6.0_32
    $echo $PATH
    Should output this ---> [Other paths]:/usr/lib/jvm/jdk1.6.0_32/bin 
    

Thursday, July 12, 2012

JMS with ActiveMQ

JMS short for Java Message Service provides a mechanism for integrating applications in a loosely coupled, flexible manner. JMS delivers data asynchronously across applications on a store and forward basis. Applications communicate through MOM(Message Oriented Middleware) which acts as an intermediary without communicating directly.

JMS Architecture

Main components of JMS are:
  • JMS Provider: A messaging system that implements the JMS interfaces and provides administrative and control features
  • Clients: Java applications that send or receive JMS messages. A message sender is called the Producer, and the recipient is called a Consumer
  • Messages: Objects that communicate information between JMS clients
  • Administered objects: Preconfigured JMS objects created by an administrator for the use of clients.
There are several JMS providers available like Apache ActiveMQ and OpenMQ. Here I have used Apache ActiveMQ.

Installing and starting Apache ActiveMQ on windows
  1. Download ActiveMQ windows binary distribution
  2. Extract the it to a desired location
  3. Using the command prompt change the directory to the bin folder inside ActiveMQ installation folder and run the following command to start ActiveMQ
  4. activemq
After starting ActiveMQ you can visit the admin console using http://localhost:8161/admin/ and do the administrative tasks

JMS Messaging Models

JMS has two messaging models, point to point messaging model and publisher subscriber messaging model.

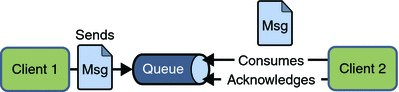
Point to point messaging model

Producer sends the message to a specified queue within JMS provider and the only one of the consumers who listening to that queue receives that message.

Image courtesy Oracle
Point to Point Model Example

Example 1 and example 2 are almost similar the only difference is example 1 creates queues within the program and the example 2 uses jndi.properties file for naming look ups and creating queues.

Example 1
package com.eviac.blog.jms;

import javax.jms.*;
import javax.naming.InitialContext;
import javax.naming.NamingException;

import org.apache.log4j.BasicConfigurator;

public class Producer {

 public Producer() throws JMSException, NamingException {

  // Obtain a JNDI connection
  InitialContext jndi = new InitialContext();

  // Look up a JMS connection factory
  ConnectionFactory conFactory = (ConnectionFactory) jndi
    .lookup("connectionFactory");
  Connection connection;

  // Getting JMS connection from the server and starting it
  connection = conFactory.createConnection();
  try {
   connection.start();

   // JMS messages are sent and received using a Session. We will
   // create here a non-transactional session object. If you want
   // to use transactions you should set the first parameter to 'true'
   Session session = connection.createSession(false,
     Session.AUTO_ACKNOWLEDGE);

   Destination destination = (Destination) jndi.lookup("MyQueue");

   // MessageProducer is used for sending messages (as opposed
   // to MessageConsumer which is used for receiving them)
   MessageProducer producer = session.createProducer(destination);

   // We will send a small text message saying 'Hello World!'
   TextMessage message = session.createTextMessage("Hello World!");

   // Here we are sending the message!
   producer.send(message);
   System.out.println("Sent message '" + message.getText() + "'");
  } finally {
   connection.close();
  }
 }

 public static void main(String[] args) throws JMSException {
  try {
   BasicConfigurator.configure();
   new Producer();
  } catch (NamingException e) {
   e.printStackTrace();
  }

 }
}
package com.eviac.blog.jms;

import javax.jms.*;

import org.apache.activemq.ActiveMQConnection;
import org.apache.activemq.ActiveMQConnectionFactory;
import org.apache.log4j.BasicConfigurator;

public class Consumer {
 // URL of the JMS server
 private static String url = ActiveMQConnection.DEFAULT_BROKER_URL;

 // Name of the queue we will receive messages from
 private static String subject = "MYQUEUE";

 public static void main(String[] args) throws JMSException {
  BasicConfigurator.configure();
  // Getting JMS connection from the server
  ConnectionFactory connectionFactory = new ActiveMQConnectionFactory(url);
  Connection connection = connectionFactory.createConnection();
  connection.start();

  // Creating session for seding messages
  Session session = connection.createSession(false,
    Session.AUTO_ACKNOWLEDGE);

  // Getting the queue
  Destination destination = session.createQueue(subject);

  // MessageConsumer is used for receiving (consuming) messages
  MessageConsumer consumer = session.createConsumer(destination);

  // Here we receive the message.
  // By default this call is blocking, which means it will wait
  // for a message to arrive on the queue.
  Message message = consumer.receive();

  // There are many types of Message and TextMessage
  // is just one of them. Producer sent us a TextMessage
  // so we must cast to it to get access to its .getText()
  // method.
  if (message instanceof TextMessage) {
   TextMessage textMessage = (TextMessage) message;
   System.out.println("Received message '" + textMessage.getText()
     + "'");
  }
  connection.close();
 }
}
Example 2

jndi.properties
# START SNIPPET: jndi

java.naming.factory.initial = org.apache.activemq.jndi.ActiveMQInitialContextFactory

# use the following property to configure the default connector
java.naming.provider.url = vm://localhost

# use the following property to specify the JNDI name the connection factory
# should appear as. 
#connectionFactoryNames = connectionFactory, queueConnectionFactory, topicConnectionFactry

# register some queues in JNDI using the form
# queue.[jndiName] = [physicalName]
queue.MyQueue = example.MyQueue


# register some topics in JNDI using the form
# topic.[jndiName] = [physicalName]
topic.MyTopic = example.MyTopic

# END SNIPPET: jndi
package com.eviac.blog.jms;

import javax.jms.*;
import javax.naming.InitialContext;
import javax.naming.NamingException;

import org.apache.log4j.BasicConfigurator;

public class Producer {

 public Producer() throws JMSException, NamingException {

  // Obtain a JNDI connection
  InitialContext jndi = new InitialContext();

  // Look up a JMS connection factory
  ConnectionFactory conFactory = (ConnectionFactory) jndi
    .lookup("connectionFactory");
  Connection connection;

  // Getting JMS connection from the server and starting it
  connection = conFactory.createConnection();
  try {
   connection.start();

   // JMS messages are sent and received using a Session. We will
   // create here a non-transactional session object. If you want
   // to use transactions you should set the first parameter to 'true'
   Session session = connection.createSession(false,
     Session.AUTO_ACKNOWLEDGE);

   Destination destination = (Destination) jndi.lookup("MyQueue");

   // MessageProducer is used for sending messages (as opposed
   // to MessageConsumer which is used for receiving them)
   MessageProducer producer = session.createProducer(destination);

   // We will send a small text message saying 'Hello World!'
   TextMessage message = session.createTextMessage("Hello World!");

   // Here we are sending the message!
   producer.send(message);
   System.out.println("Sent message '" + message.getText() + "'");
  } finally {
   connection.close();
  }
 }

 public static void main(String[] args) throws JMSException {
  try {
   BasicConfigurator.configure();
   new Producer();
  } catch (NamingException e) {
   e.printStackTrace();
  }

 }
}
package com.eviac.blog.jms;

import javax.jms.*;
import javax.naming.InitialContext;
import javax.naming.NamingException;

import org.apache.log4j.BasicConfigurator;

public class Consumer {
 public Consumer() throws NamingException, JMSException {
  Connection connection;
  
  // Obtain a JNDI connection
  InitialContext jndi = new InitialContext();

  // Look up a JMS connection factory
  ConnectionFactory conFactory = (ConnectionFactory) jndi
    .lookup("connectionFactory");
  // Getting JMS connection from the server and starting it
  // ConnectionFactory connectionFactory = new
  // ActiveMQConnectionFactory(url);
  connection = conFactory.createConnection();

  // // Getting JMS connection from the server
  // ConnectionFactory connectionFactory = new
  // ActiveMQConnectionFactory(url);
  // Connection connection = connectionFactory.createConnection();
  try {
   connection.start();

   // Creating session for seding messages
   Session session = connection.createSession(false,
     Session.AUTO_ACKNOWLEDGE);

   // Getting the queue
   Destination destination = (Destination) jndi.lookup("MyQueue");

   // MessageConsumer is used for receiving (consuming) messages
   MessageConsumer consumer = session.createConsumer(destination);

   // Here we receive the message.
   // By default this call is blocking, which means it will wait
   // for a message to arrive on the queue.
   Message message = consumer.receive();

   // There are many types of Message and TextMessage
   // is just one of them. Producer sent us a TextMessage
   // so we must cast to it to get access to its .getText()
   // method.
   if (message instanceof TextMessage) {
    TextMessage textMessage = (TextMessage) message;
    System.out.println("Received message '" + textMessage.getText()
      + "'");
   }
  } finally {
   connection.close();
  }
 }

 public static void main(String[] args) throws JMSException {
  BasicConfigurator.configure();
  try {
   new Consumer();
  } catch (NamingException e) {
   // TODO Auto-generated catch block
   e.printStackTrace();
  }

 }
}

Publisher Subscriber Model

Publisher publishes the message to a specified topic within JMS provider and all the subscribers who subscribed for that topic receive the message. Note that only the active subscribers receive the message.

Image courtesy Oracle
Point to Point Model Example
package com.eviac.blog.jms;

import javax.jms.*;
import javax.naming.*;

import org.apache.log4j.BasicConfigurator;

import java.io.BufferedReader;
import java.io.InputStreamReader;

public class DemoPublisherSubscriberModel implements javax.jms.MessageListener {
 private TopicSession pubSession;
 private TopicPublisher publisher;
 private TopicConnection connection;

 /* Establish JMS publisher and subscriber */
 public DemoPublisherSubscriberModel(String topicName, String username,
   String password) throws Exception {
  // Obtain a JNDI connection
  InitialContext jndi = new InitialContext();

  // Look up a JMS connection factory
  TopicConnectionFactory conFactory = (TopicConnectionFactory) jndi
    .lookup("topicConnectionFactry");

  // Create a JMS connection
  connection = conFactory.createTopicConnection(username, password);

  // Create JMS session objects for publisher and subscriber
  pubSession = connection.createTopicSession(false,
    Session.AUTO_ACKNOWLEDGE);
  TopicSession subSession = connection.createTopicSession(false,
    Session.AUTO_ACKNOWLEDGE);

  // Look up a JMS topic
  Topic chatTopic = (Topic) jndi.lookup(topicName);

  // Create a JMS publisher and subscriber
  publisher = pubSession.createPublisher(chatTopic);
  TopicSubscriber subscriber = subSession.createSubscriber(chatTopic);

  // Set a JMS message listener
  subscriber.setMessageListener(this);

  // Start the JMS connection; allows messages to be delivered
  connection.start();

  // Create and send message using topic publisher
  TextMessage message = pubSession.createTextMessage();
  message.setText(username + ": Howdy Friends!");
  publisher.publish(message);

 }

 /*
  * A client can register a message listener with a consumer. A message
  * listener is similar to an event listener. Whenever a message arrives at
  * the destination, the JMS provider delivers the message by calling the
  * listener's onMessage method, which acts on the contents of the message.
  */
 public void onMessage(Message message) {
  try {
   TextMessage textMessage = (TextMessage) message;
   String text = textMessage.getText();
   System.out.println(text);
  } catch (JMSException jmse) {
   jmse.printStackTrace();
  }
 }

 public static void main(String[] args) {
  BasicConfigurator.configure();
  try {
   if (args.length != 3)
    System.out
      .println("Please Provide the topic name,username,password!");

   DemoPublisherSubscriberModel demo = new DemoPublisherSubscriberModel(
     args[0], args[1], args[2]);

   BufferedReader commandLine = new java.io.BufferedReader(
     new InputStreamReader(System.in));

   // closes the connection and exit the system when 'exit' enters in
   // the command line
   while (true) {
    String s = commandLine.readLine();
    if (s.equalsIgnoreCase("exit")) {
     demo.connection.close();
     System.exit(0);

    }
   }
  } catch (Exception e) {
   e.printStackTrace();
  }
 }
}
JMS programming model: Image Courtesy Oracle

Wednesday, July 4, 2012

Apache Thrift with Java quickstart

Apache Thrift is a RPC framework founded by facebook and now it is an Apache project. Thrift lets you define data types and service interfaces in a language neutral definition file. That definition file is used as the input for the compiler to generate code for building RPC clients and servers that communicate over different programming languages. You can refer Thrift white paper also.

According to the official web site Apache Thrift is a,
software framework, for scalable cross-language services development, combines a software stack with a code generation engine to build services that work efficiently and seamlessly between C++, Java, Python, PHP, Ruby, Erlang, Perl, Haskell, C#, Cocoa, JavaScript, Node.js, Smalltalk, OCaml and Delphi and other languages.
Image courtesy wikipedia

Installing Apache Thrift in Windows

Installation Thrift can be a tiresome process. But for windows the compiler is available as a prebuilt exe. Download thrift.exe and add it into your environment variables.

Writing Thrift definition file (.thrift file)

Writing the Thrift definition file becomes really easy once you get used to it. I found this tutorial quite useful to begin with.

Example definition file (add.thrift)
namespace java com.eviac.blog.samples.thrift.server  // defines the namespace 

typedef i32 int  //typedefs to get convenient names for your types

service AdditionService {  // defines the service to add two numbers
        int add(1:int n1, 2:int n2), //defines a method
}

Compiling Thrift definition file

To compile the .thrift file use the following command.
 
thrift --gen <language> <Thrift filename>
For my example the command is,
 
thrift --gen java add.thrift
After performing the command, inside gen-java directory you'll find the source codes which is useful for building RPC clients and server. In my example it will create a java code called AdditionService.java

Writing a service handler

Service handler class is required to implement the AdditionService.Iface interface.

Example service handler (AdditionServiceHandler.java)
 
package com.eviac.blog.samples.thrift.server;

import org.apache.thrift.TException;

public class AdditionServiceHandler implements AdditionService.Iface {

 @Override
 public int add(int n1, int n2) throws TException {
  return n1 + n2;
 }

}
Writing a simple server

Following is an example code to initiate a simple thrift server. To enable the multithreaded server uncomment the commented parts of the example code.

Example server (MyServer.java)
package com.eviac.blog.samples.thrift.server;

import org.apache.thrift.transport.TServerSocket;
import org.apache.thrift.transport.TServerTransport;
import org.apache.thrift.server.TServer;
import org.apache.thrift.server.TServer.Args;
import org.apache.thrift.server.TSimpleServer;

public class MyServer {

 public static void StartsimpleServer(AdditionService.Processor<AdditionServiceHandler> processor) {
  try {
   TServerTransport serverTransport = new TServerSocket(9090);
   TServer server = new TSimpleServer(
     new Args(serverTransport).processor(processor));

   // Use this for a multithreaded server
   // TServer server = new TThreadPoolServer(new
   // TThreadPoolServer.Args(serverTransport).processor(processor));

   System.out.println("Starting the simple server...");
   server.serve();
  } catch (Exception e) {
   e.printStackTrace();
  }
 }
 
 public static void main(String[] args) {
  StartsimpleServer(new AdditionService.Processor<AdditionServiceHandler>(new AdditionServiceHandler()));
 }

}

Writing the client

Following is an example java client code which consumes the service provided by AdditionService.

Example client code (AdditionClient.java)
package com.eviac.blog.samples.thrift.client;

import org.apache.thrift.TException;
import org.apache.thrift.protocol.TBinaryProtocol;
import org.apache.thrift.protocol.TProtocol;
import org.apache.thrift.transport.TSocket;
import org.apache.thrift.transport.TTransport;
import org.apache.thrift.transport.TTransportException;

public class AdditionClient {

 public static void main(String[] args) {

  try {
   TTransport transport;

   transport = new TSocket("localhost", 9090);
   transport.open();

   TProtocol protocol = new TBinaryProtocol(transport);
   AdditionService.Client client = new AdditionService.Client(protocol);

   System.out.println(client.add(100, 200));

   transport.close();
  } catch (TTransportException e) {
   e.printStackTrace();
  } catch (TException x) {
   x.printStackTrace();
  }
 }

}


Run the server code(MyServer.java). It should output following and will listen to the requests.
Starting the simple server...
Then run the client code(AdditionClient.java). It should output following.
300

Thursday, June 28, 2012

MongoDB with Java

NoSQL databases due to their scalability are becoming increasingly popular. When used appropriately NoSQL databases can offer real benefits. MongoDB is such a highly scalable opensource NoSQL database written in C++.

1. Installing MongoDB

Without much of a trouble you can install MongoDB using the instructions given in the official MongoDB site, according to whatever the OS you are using.

2. Starting the MongoDB server

This is quite simple. Run the mongod.exe file inside bin folder(I am using windows OS here) to start the MongoDB server.

By default the server will start on port 27017 and the data will be stored at /data/db directory which you'll have to create during the installing process.

3. Starting MongoDB shell

You can start the MongoBD shell by running the mongo.exe file.

4. Creating a database with MongoDB

To create a database named "company" using MongoDB type the following on MongoDB shell
 use company 
Mind that MangoDB will not create a database until you save something inside it.

Use following command to view the available databases and that will show you that "company" database hasn't been created yet.
 show dbs; 
5. Saving data in MongoDB

Use following commands to save employee data to a collection called employees
 
employee = {name : "A", no : 1} 
db.employees.save(employee) 
To view the data inside the collection use following command,
 
db.users.find(); 
Do it with Java :)

Following is a simple Java code which is doing the same thing we did above. You can get the mongo-java driver from here.

Just go through the code, it's very simple, hopefully you'll get the idea.
 
package com.eviac.blog.mongo;

import java.net.UnknownHostException;

import com.mongodb.BasicDBObject;
import com.mongodb.DB;
import com.mongodb.DBCollection;
import com.mongodb.DBCursor;
import com.mongodb.Mongo;
import com.mongodb.MongoException;

public class MongoDBClient {

 public static void main(String[] args) {

  try {

   Mongo mongo = new Mongo("localhost", 27017);

   DB db = mongo.getDB("company");

   DBCollection collection = db.getCollection("employees");

   BasicDBObject employee = new BasicDBObject();
   employee.put("name", "Hannah");
   employee.put("no", 2);

   collection.insert(employee);

   BasicDBObject searchEmployee = new BasicDBObject();
   searchEmployee.put("no", 2);

   DBCursor cursor = collection.find(searchEmployee);

   while (cursor.hasNext()) {
    System.out.println(cursor.next());
   }

   System.out.println("The Search Query has Executed!");

  } catch (UnknownHostException e) {
   e.printStackTrace();
  } catch (MongoException e) {
   e.printStackTrace();
  }

 }

}
 
Result
 
{ "_id" : { "$oid" : "4fec74dc907cbe9445fd2d70"} , "name" : "Hannah" , "no" : 2}
The Search Query has Executed! 

Wednesday, July 6, 2011

Parsing JSON (comes as a response to a web request) using java

JSON (JavaScript Object Notation) as in definition is a light weight data exchange format, a fat free alternative to XML. In today's post I will show you how to parse JSON (comes as a response to a web request) using java.

First download json-lib and add it to your classpath. You'll also have to add following libraries to your classpath

  1. commons-lang.jar
  2. commons-beanutils.jar
  3. commons-collections.jar
  4. commons-logging.jar
  5. ezmorph.jar

What you need next is a request url and it's response should be JSON data. You will see mine in the example code I've provided, if you know how to use firebug the task will be much more simpler. In your browser run that request you'll get the JSON data which I parse, it's lengthy that's why I didn't add it in here. If you get untidy JSON data, format it using jasonlint.

Now let's move on to the example code, it's not hard to understand, simply go through it. Refer comments for clarifications.

java code

import java.io.BufferedReader;
import java.io.IOException;
import java.io.InputStreamReader;
import java.net.URL;
import net.sf.json.JSONArray;
import net.sf.json.JSONObject;
import net.sf.json.JSONSerializer;

public class JsonParse { 

 public static void main(String[] args) {
  String jsonString = "";

  String city = "London";
  String country = "United+Kingdom";

  //This is the request url  
  String requestUrl = "http://www.bing.com/travel/hotel/hotelReferenceData.do?q="
    + city
    + "%2C+"
    + country
    + "+leave+07%2F08%2F2011+return+07%2F10%2F2011+adults%3A2+rooms%3A1&distanceFrom=22&HotelPriceRange=1%2C2%2C3%2C4&pageOffset=0&pageCount=240&cim=2011-07-08&com=2011-07-10&a=2&c=0&r=1&sortBy=PopularityDesc";
  try {
   URL url = new URL(requestUrl.toString());
   BufferedReader in = new BufferedReader(new InputStreamReader(
     url.openStream()));
   String inputLine;

   while ((inputLine = in.readLine()) != null) {
    //JSON data get stored as a string
    jsonString = inputLine;

   }
   in.close();
   //the way to parse JSON array
   JSONArray json = (JSONArray) JSONSerializer.toJSON(jsonString);
   //getting another JSON string to parse
   String parse1 = json.getString(0);
   
   //the way to parse JSON object
   JSONObject json2 = (JSONObject) JSONSerializer.toJSON(parse1);
   //getting a json array inside JSON object
   JSONArray array1 = json2.getJSONArray("hotels");

   for (int i = 0; i < array1.size(); i++) {
    //getting a JSON object inside JSON array
    JSONObject jhotelrec = array1.getJSONObject(i);    
    System.out.println("Hotel Name= "+jhotelrec.getString("name")+"\n"+"Geo Codes= "+jhotelrec.getJSONArray("geoPoint").getString(0)+","+jhotelrec.getJSONArray("geoPoint").getString(1));
    }

  } catch (IOException e) {
   e.printStackTrace();
  }
 }


}


Monday, July 4, 2011

xml parsing with java

In certain situations we java programmers may need to access information in XML documents using a java xml parser. This post will guide you to parse a xml document with java, using DOM parser and Xpath.

xmlfile.xml

Given XML document is quite lengthy, but do not worry because parsing a lengthy XML document is as easy as parsing a short XML document :) .

<a>
<e>
<hotels class="array">
   <e class="object">
    <addressLine1 type="string">4 Rue du Mont-Thabor</addressLine1>
    <amenities class="array">
     <e type="string">24</e>
     <e type="string">31</e>
     <e type="string">42</e>
     <e type="string">52</e>
     <e type="string">9</e>
    </amenities>
    <brandCode type="string">69</brandCode>
    <cachedPrice type="number">935</cachedPrice>
    <city type="string">Paris</city>
    <country type="string">US</country>
    <geoPoint class="array">
     <e type="number">48.86536</e>
     <e type="number">2.329584</e>
    </geoPoint>
    <hotelRateIndicator type="string">2</hotelRateIndicator>
    <id type="number">56263</id>
    <name type="string">Renaissance Paris Vendome Hotel</name>
    <neighborhood type="string" />
    <popularity type="number">837</popularity>
    <starRating type="string">5</starRating>
    <state type="string">IdF</state>
    <telephoneNumbers class="array">
     <e type="string" />
    </telephoneNumbers>
    <thumbnailUrl type="string">http://www.orbitz.com//public/hotelthumbnails/53/97/85397/85397_TBNL_1246535840051.jpg
    </thumbnailUrl>
    <total type="number">250</total>
    <ypid type="string">YN10001x300073304</ypid>
   </e>
   <e class="object">
    <addressLine1 type="string">39 Avenue de Wagram</addressLine1>
    <amenities class="array">
     <e type="string">24</e>
     <e type="string">31</e>
     <e type="string">42</e>
     <e type="string">9</e>
    </amenities>
    <brandCode type="string">69</brandCode>
    <cachedPrice type="number">633</cachedPrice>
    <city type="string">Paris</city>
    <country type="string">US</country>
    <geoPoint class="array">
     <e type="number">48.877106</e>
     <e type="number">2.297451</e>
    </geoPoint>
    <hotelRateIndicator type="string">3</hotelRateIndicator>
    <id type="number">112341</id>
    <name type="string">Renaissance Paris Arc de Triomphe Hotel</name>
    <neighborhood type="string" />
    <popularity type="number">796</popularity>
    <starRating type="string">5</starRating>
    <state type="string">IdF</state>
    <telephoneNumbers class="array">
     <e type="string" />
    </telephoneNumbers>
    <thumbnailUrl type="string">http://www.orbitz.com//public/hotelthumbnails/21/72/302172/302172_TBNL_1246535872514.jpg
    </thumbnailUrl>
    <total type="number">250</total>
    <ypid type="string">YN10001x300073331</ypid>
   </e>
   <e class="object">
    <addressLine1 type="string">35 Rue de Berri</addressLine1>
    <amenities class="array">
     <e type="string">24</e>
     <e type="string">31</e>
     <e type="string">42</e>
     <e type="string">9</e>
    </amenities>
    <brandCode type="string">82</brandCode>
    <cachedPrice type="number">706</cachedPrice>
    <city type="string">Paris</city>
    <country type="string">US</country>
    <geoPoint class="array">
     <e type="number">48.873684</e>
     <e type="number">2.306411</e>
    </geoPoint>
    <hotelRateIndicator type="string">3</hotelRateIndicator>
    <id type="number">108606</id>
    <name type="string">Crowne Plaza Hotel PARIS-CHAMPS ELYSÉES</name>
    <neighborhood type="string" />
    <popularity type="number">796</popularity>
    <starRating type="string">5</starRating>
    <state type="string">IdF</state>
    <telephoneNumbers class="array">
     <e type="string" />
    </telephoneNumbers>
    <thumbnailUrl type="string">http://www.orbitz.com//public/pegsimages/CP/thumb_PARAT.jpg
    </thumbnailUrl>
    <total type="number">250</total>
    <ypid type="string">YN10001x300161106</ypid>
   </e>
   </hotels>
 </e>
</a>   


XMLsample.java

In this code I have used DOM parser and xpath java library to query xml document. Here I am trying to extract hotel information[Hotel name, geo codes, star rating] from xmlfile.xml document

package com.eviac.blog;

import javax.xml.parsers.DocumentBuilder;
import javax.xml.parsers.DocumentBuilderFactory;
import javax.xml.xpath.XPath;
import javax.xml.xpath.XPathConstants;
import javax.xml.xpath.XPathExpression;
import javax.xml.xpath.XPathFactory;

import org.w3c.dom.Document;
import org.w3c.dom.NodeList;

public class XMLsample {

 public static void main(String[] args) {

  try {
   // loading the xml document into DOM Document object
   DocumentBuilderFactory domFactory = DocumentBuilderFactory.newInstance();
   domFactory.setNamespaceAware(true);
   DocumentBuilder builder = domFactory.newDocumentBuilder();
   Document doc = builder.parse("xmlfile.xml");

   // XPath object using XPathFactory
   XPath xpath = XPathFactory.newInstance().newXPath();
   
   // XPath Query, compiling the path using the compile() method
   XPathExpression expr = xpath.compile("//hotels/e/name | //hotels/e/starRating | //hotels/e/geoPoint/e/text()");
   Object result = expr.evaluate(doc, XPathConstants.NODESET);
   NodeList nodes = (NodeList) result;
   for (int i = 0; i < nodes.getLength(); i++) {
    System.out.println(nodes.item(i).getTextContent());
   }
  } catch (Exception e) {
   e.printStackTrace();
  }
 }
}


Output
48.86536
2.329584
Renaissance Paris Vendome Hotel
5
48.877106
2.297451
Renaissance Paris Arc de Triomphe Hotel
5
48.873684
2.306411
Crowne Plaza Hotel PARIS-CHAMPS ELYSÉES
5

Sunday, February 13, 2011

Crypto Samples in java part four -Stream Cipher

SendStream.java

import java.io.FileOutputStream;
import java.io.ObjectOutputStream;

import javax.crypto.Cipher;
import javax.crypto.CipherOutputStream;
import javax.crypto.KeyGenerator;
import javax.crypto.SecretKey;

public class SendStream {
 
 public static void main(String[] args) {
  
  String data = "This have I thought good to deliver thee rrrr";
  
  //---------------Encryption ---------------------------------

  SecretKey key = null;

  try {
   KeyGenerator keygen = KeyGenerator.getInstance("DES");
   key = keygen.generateKey();

   Cipher cipher = Cipher.getInstance("DES/CBC/PKCS5Padding");
   cipher.init(Cipher.ENCRYPT_MODE, key);
   
   FileOutputStream fos = new FileOutputStream("cipher.file"); 
   CipherOutputStream cos = new CipherOutputStream(fos, cipher);
   ObjectOutputStream oos = new ObjectOutputStream(cos);   
   
   
   oos.writeObject(data);
   oos.flush();
   oos.close();
   
   
   FileOutputStream fosKey = new FileOutputStream("key.file"); 
   ObjectOutputStream oosKey = new ObjectOutputStream(fosKey); 
   oosKey.writeObject(key);
   oosKey.writeObject(cipher.getIV());

  } catch (Exception e) {
   e.printStackTrace();
  } 

 }

}


ReceiveStream.java

package ucsc.cipher;

import java.io.FileInputStream;
import java.io.ObjectInputStream;

import javax.crypto.Cipher;
import javax.crypto.CipherInputStream;
import javax.crypto.SecretKey;
import javax.crypto.spec.IvParameterSpec;

public class RecieveStream {
 
 public static void main(String[] args) {
  SecretKey key = null;

  try {
   FileInputStream fisKey = new FileInputStream("key.file"); 
   ObjectInputStream oosKey = new ObjectInputStream(fisKey); 
   
   key =  (SecretKey)oosKey.readObject();
   
   byte[] iv = (byte[])oosKey.readObject();


   Cipher cipher = Cipher.getInstance("DES/CBC/PKCS5Padding");
   cipher.init(Cipher.DECRYPT_MODE, key, new IvParameterSpec(iv));
   
   FileInputStream fis = new FileInputStream("cipher.file"); 
   CipherInputStream cis = new CipherInputStream(fis, cipher);
   ObjectInputStream ois = new ObjectInputStream(cis);   
   
   
            System.out.println((String)ois.readObject());   
   
  } catch (Exception e) {
   e.printStackTrace();
  } 

  
 }

}


Friday, February 11, 2011

Crypto Samples in java part three - Symmetric key encryption


A secret key is generated and only known by the sender and the receiver. Sender encrypts the plain text in to cypher text using the shared key and sends it to the receiver. After Receiver receives the encrypted message he/she decrypts the message using the shared key and grabs the original plain text (have a look at the image for a better understanding).

import java.security.spec.AlgorithmParameterSpec;

import javax.crypto.Cipher;
import javax.crypto.KeyGenerator;
import javax.crypto.SecretKey;
import javax.crypto.spec.IvParameterSpec;

public class SimpleCipher {

 public static void main(String[] args) {

  String data = "This have I thought good to deliver thee";

  // ---------------Encryption ---------------------------------

  byte[] encrypted = null;
  byte[] iv = null;
  SecretKey key = null;

  try {
   KeyGenerator keygen = KeyGenerator.getInstance("DES");/*
                 * get the key
                 * generator
                 * instance
                 */
   key = keygen.generateKey();// generate the secret key

   Cipher cipher = Cipher.getInstance("DES/CBC/PKCS5Padding");
   /*
    * get cipher engine instance.DES algorithm is used and it requires
    * the input data to be 8-byte sized blocks. To encrypt a plain text
    * message that is not multiples of 8-byte blocks, the text message
    * must be padded with additional bytes to make the text message to
    * be multiples of 8-byte blocks.PKCS5Padding has used for that
    * purpose. note that CBC is a block cipher mode therefore we need
    * an initialization vector to chain blocks.
    */

   cipher.init(Cipher.ENCRYPT_MODE, key);/*
             * initializing cipher engine
             * for encryption
             */

   encrypted = cipher.doFinal(data.getBytes());/* do the encryption */

   iv = cipher.getIV();/*
         * save the initialization vector, remember that
         * we need this only when we are using cipher
         * block chaining mode for encryption
         */

  } catch (Exception e) {
   e.printStackTrace();
  }

  // ---------------Decryption ---------------------------------

  try {

   Cipher cipher = Cipher.getInstance("DES/CBC/PKCS5Padding");/*
                   * get
                   * cipher
                   * engine
                   * instance
                   */

   AlgorithmParameterSpec param = new IvParameterSpec(iv);/*
                  * set the
                  * vector
                  * value
                  */

   cipher.init(Cipher.DECRYPT_MODE, key, param);/*
               * initializing cipher
               * engine for decryption
               */

   byte[] decrypted = cipher.doFinal(encrypted);/*
               * obtain original plain
               * text
               */

   System.out.println(new String(decrypted));

  } catch (Exception e) {
   e.printStackTrace();
  }

 }

}